
We have written come acceptance tests in the last tutorial. Time to run them on the cloud. No way I would spend 10 minutes to wait for my tests ran for multiple PHP and WordPress versions.
Continue from the last tutorial, I’ve removed some unused pieces and added PHP_CodeSniffer to the project. Nothing related to acceptance testing. Head over to the GitHub repo if you are interested.
Prevent Race Conditions
A problem I found is that the tests failed randomly. The reason is that our tests tries to click some links before they show up on the screen. Adding $I->waitForElement('some element', 10); solves the problem.
Scroll To the Link
Secondly, when changing the screen size, the link
Acceptance Test for rmcl fails out of the screen. Adding
$I->click('Acceptance Test for rmcl'); solves it.
So the tests become:
$I->amOnpage('/');
$I->waitForElement('p.site-description', 10);
$I->scrollTo(['css' => 'h2.entry-title']);
Use PhantomJS
You can run the tests on real browsers on TravisCI with Sauce Labs. But it’s too slow for me. I opt for PhantomJS instead.
Install PhantomJS
The Selenium server I used the last tutorial becomes buggy. I switched to use PhantomJS lately.
$ composer require --dev jakoch/phantomjs-installer neronmoon/scriptsdev site5/phantomanThen, add this section in composer.json:
"scripts-dev": {
    "post-install-cmd": [
        "PhantomInstaller\\Installer::installPhantomJS"
    ],
    "post-update-cmd": [
        "PhantomInstaller\\Installer::installPhantomJS"
    ]
}
PhpStorm (or your IDE) would complain scripts-dev is not valid in composer.json. It’s totally fine because we only want to install PhantomJS on dev environment. I’ve made a pull request to move it into the extra section. Until it’s merged, ignore the warning.
Codeception Config
First, create a codeception.dist.yml file so we can have different settings for different environments (local and Travis). Moving the settings in acceptance.suite.yml into codeception.dist.yml makes it easier to manage the settings. Here is all the settings we need for local and for TravisCI.
# tests/acceptance.suite.yml
class_name: AcceptanceTester
modules:
  enabled:
    - \Helper\Acceptance
    - WPDb
    - WPWebDriver
#codeception.dist.yml
actor: Tester
paths:
  tests: tests
  log: tests/_output
  data: tests/_data
  helpers: tests/_support
settings:
  backup_globals: false # See: https://core.trac.wordpress.org/ticket/39327
  bootstrap: _bootstrap.php
  shuffle: true
  colors: true
  memory_limit: 1024M
modules:
  config:
    WPDb:
      dsn: 'mysql:host=localhost;dbname=wordpress'
      user: 'root'
      password: ''
      dump: 'tests/_data/dump.sql'
      url: 'http://wp.dev:8080'
    WPWebDriver:
      url: 'http://wp.dev:8080'
      port: 4444
      window_size: '1024x768'
      adminUsername: 'admin'
      adminPassword: 'password'
      adminPath: '/wp-admin'
      host: 'wp.dev'
      browser: 'phantomjs'
      activatePlugins: ['medium/medium.php']
extensions:
  enabled:
    - Codeception\Extension\Phantoman
  config:
    Codeception\Extension\Phantoman:
      port: 4444
      suites: ['acceptance']
# codeception.yml
modules:
  config:
    WPDb:
      dsn: 'mysql:host=vvv.dev;dbname=rmcl-tester'
      user: 'external'
      password: 'external'
      url: 'http://rmcl-tester.dev'
    WPWebDriver:
      url: 'http://rmcl-tester.dev'
      host: '127.0.0.1'
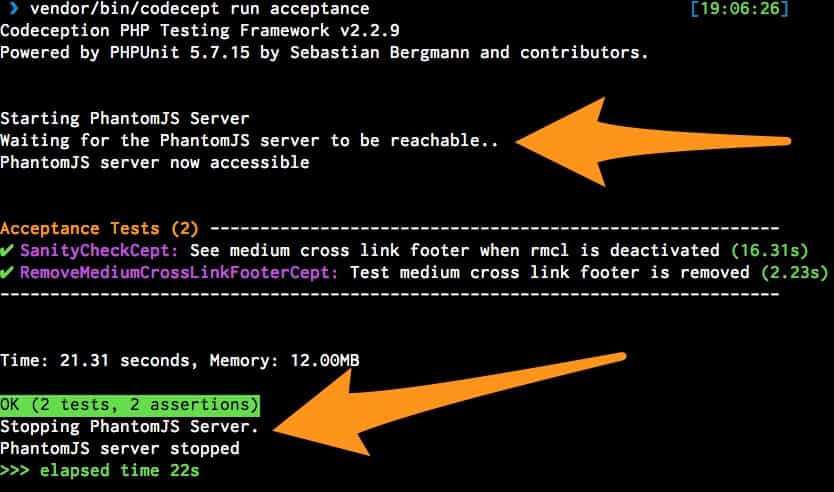
Run the Tests Again
With the above configs, running $ composer install or $ composer update will install PhantomJS also.
$ composer install
PhantomInstaller\Installer::installPhantomJS
- Installing phantomjs (2.1.1): Loading from cache
When running acceptance tests, PhantomJS starts and stops itself automatically.
Codeception Phantoman Extension
Building the Plugin
We need a way to install our plugin on travis. Using composer archive to generate a zip file and then install it via WP-CLI seems the simplest solution. Adding a composer build command into composer.json:
"scripts": {
    "build": [
        "rm -fr vendor",
        "composer install --no-dev --prefer-dist --no-suggest",
        "composer archive --format=zip --dir=release --file=remove-medium-cross-links"
    ],
},
"archive": {
    "exclude": [
        "/*",
        ".*",
        "!/languages",
        "!/src",
        "!/vendor",
        "!/LICENSE",
        "!/README.txt",
        "!/*.php"
    ]
}
Now, run $ composer build to make the zip file. This is the final plugin you want to publish on wordpress.org. Note that we don’t need vendor in this simple plugin, but it’s required in most of the cases. You can also add more tasks in the build process, for example: grunt addtextdomain and grunt makepot.
Finally, TravisCI Settings
# .travis.yml
language: php

sudo: false

services:
  - mysql

addons:
  apt:
    packages:
      - nginx

php:
  - 7.0
  - 7.1
  - nightly

env:
  global:
    - COMPOSER_NO_INTERACTION=1
  matrix:
    - WP_VERSION=nightly
    - WP_VERSION=latest
    - WP_VERSION=4.7.2

matrix:
  allow_failures:
    - php: nightly
    - env: WP_VERSION=nightly
  fast_finish: true

before_install:
  # Install helper scripts
  - travis_retry composer global require --prefer-dist --no-suggest typisttech/travis-nginx-wordpress:"^2.0"
  - export PATH=$HOME/.composer/vendor/bin:$PATH
  - tnw-install-nginx
  - tnw-install-wordpress
  - tnw-prepare-codeception

  # Build the production plugin
  - travis_retry composer build
  # Install the medium plugin
  - wp plugin install medium --force --activate --path=/tmp/wordpress
  # Activate the plugin
  - wp plugin install ./release/remove-medium-cross-links.zip --force --activate --path=/tmp/wordpress
  # Export a dump of plugin-activated database to the _data folder
  - wp db export $TRAVIS_BUILD_DIR/tests/_data/dump.sql --path=/tmp/wordpress

install:
  - travis_retry composer install --prefer-dist --no-suggest

script:
  - vendor/bin/codecept run acceptance
Most of the work is done through the travis-nginx-wordpress package:
- Install Nginx
- Install correct version of WordPress core
- Ensure WordPress databases at localhost is ready for testing
- Start WordPress server at http://wp.dev:8080
Next, we build and install our plugin along with the official Medium plugin. Finally, install dependencies and actually run the tests.
Pushing to GitHub should trigger TravisCI to run the tests.
Tweaking
Caching
You can cache apt and composer packages to speed up the build. Make sure you add the --prefer-dist flag in $ composer install and add this section to .travis.yml:
cache:
  apt: true
  directories:
    - $HOME/.composer/cache/files
Travis Nginx WordPress
There’re more helper scripts from the travis-nginx-wordpress package, find out more here.
Until Next Time…
Full source code is can be found on GitHub.
Nothing stops our journey to TravisCI. I will talk about how to publish the plugin to wordpress.org after tests passed. Make sure you have subscribed my newsletter!